Assignment 3: Final product

And so my project comes to a end.
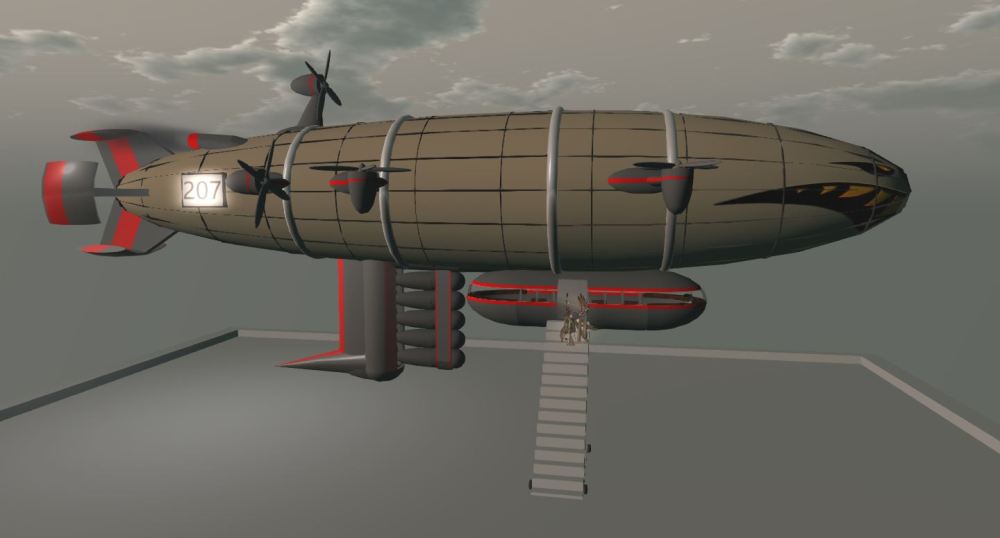
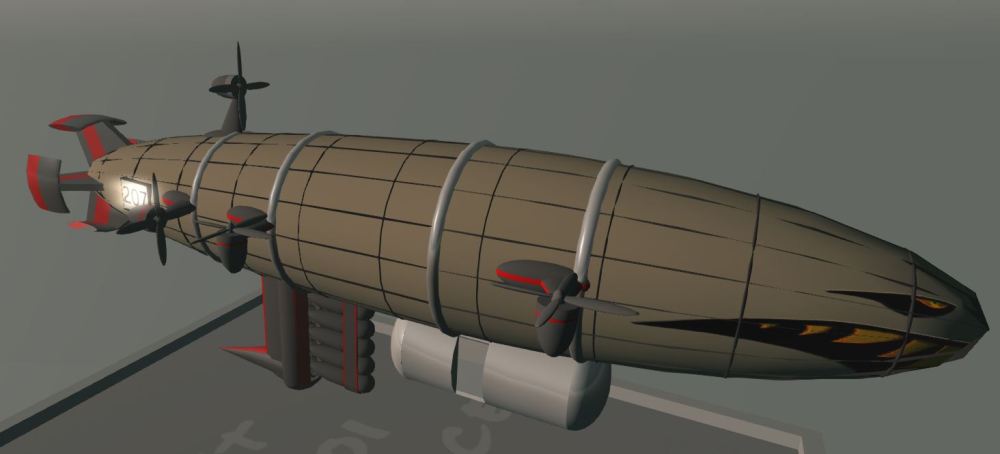
Pic 21

Finished build

Overall I am very happy with what I have built and I feel that my project easily meets the requirements set in the brief. These are bellow:

  • A minimum of 50 and a maximum of 300 prims used in the construction
    • 227 prims excluding the ramp and 270 with ramp.
  • At least three different primitive types (i.e. Sphere, Torus, etc.)
    • 5 different prim types used which can be seen bellow.
  • At least four different forms of prim manipulation (i.e. Cut, Twist, etc.)
    • Almost all of my shapes have some sort of prim manipulation in place
  • The use of different textures and colours throughout the build with consideration given to using appropriate textures, texture repeats, offsets and rotations
    • 9 different custom-made textures are in use throughout the build
  • At least two different texture manipulations (i.e. Glow, Shininess, etc.)
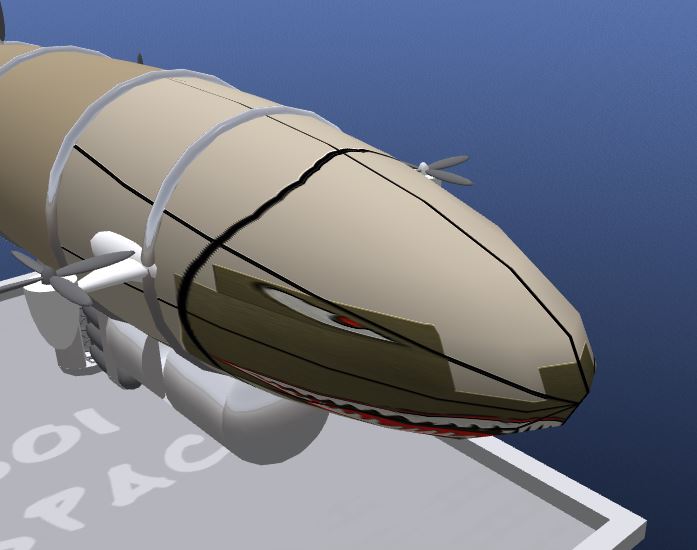
    • The metal elements of the main body have a high shininess applied and the identifier a glow
  • The appropriate use of multiple textures on a prim
    • Several objects such as the computers have multiple textures on the object. Others like the tail and under carriage have different parameters applied to different sides of the prim, but use the same texture
  • The appropriate scale for purpose both in construction and texture use
    • Build is limited by Second Life max prim size but is still as accurate as possible

Because two types of build are available an additional set of requirements are in place for the complex interactivity section. These are as follows:

  • A scanning system that will detect the presence of an avatar then interact with the avatar in some manner
    • Right hand computer has a “radar” option which will list all avatars in the area to the clicker
  • A prim’s inventory item (Content) passed to an avatar
    • Left hand computer will give the clicker a notecard
  • An instance of scripted communication with an avatar via main chat
    • Steering wheel, right hand computer and bomb drop button(at rear of carriage) will all out put to chat when an action has been completed
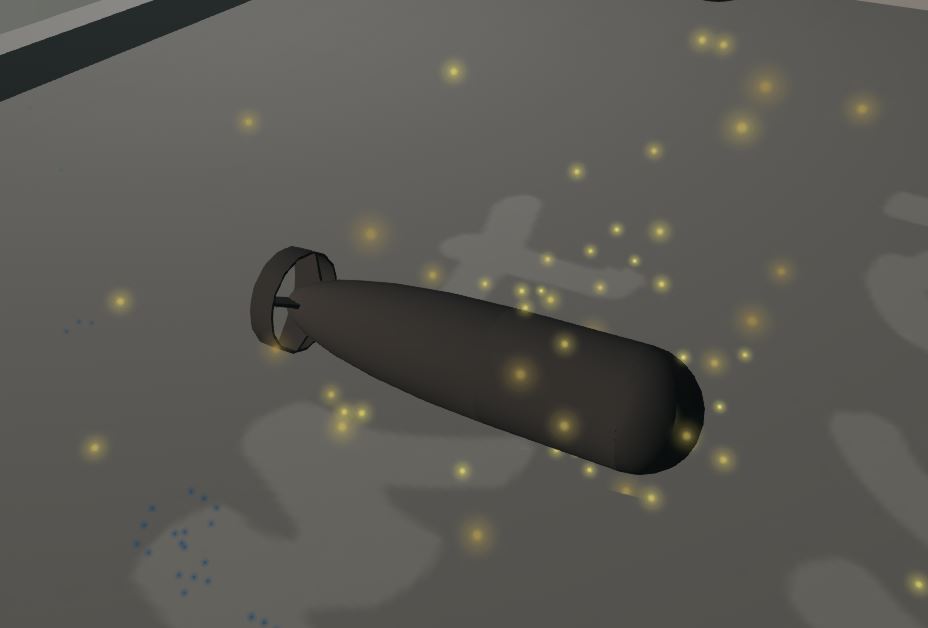
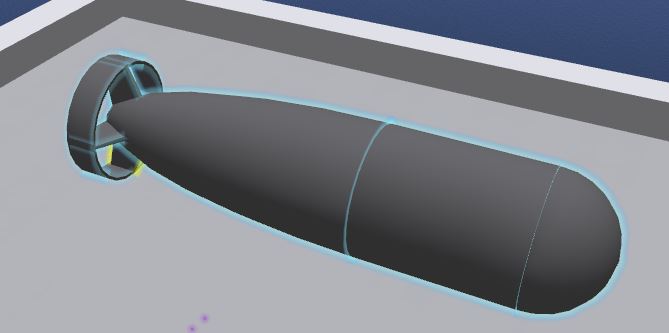
  • An appropriate particle system
    • Exhaust pipes on rear of main body exhaust smoke, bomb will emit explosion particles on touching another object
  • The presentation of a dialog menu with a minimum of three options displayed
    • Right hand computer displays dialog menu on click
  • A link out to a web page
    • Right hand computer has option to view reference image
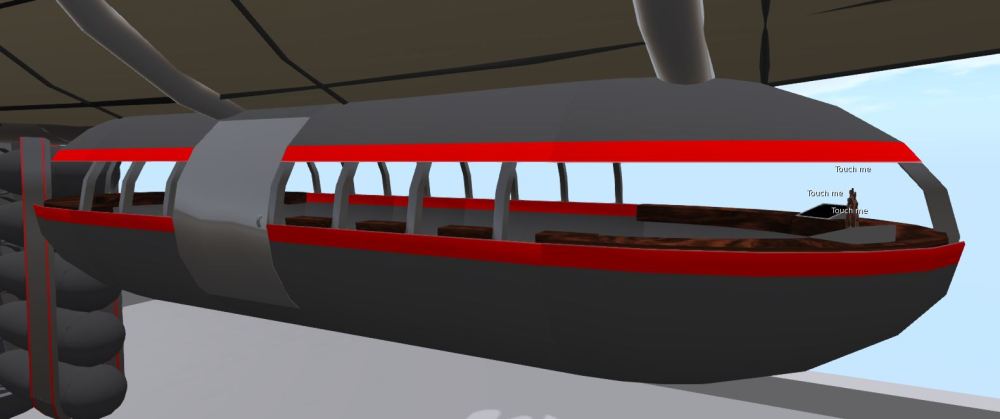
  • The sitting of an avatar on a prim with the purpose of either “seating” or “teleporting” the avatar
    • Bench seats are available inside
  • Prim movement through scripting
    • Lift props will always spin, forward props will spin or stop under right hand computers command
  • An object rezzed from the inventory of another object
    • Bomb will spawn outside on bomb drop button click. Bomb will delete its self after 10 seconds.

As we can see my project defiantly meets the requirements, I can only hope others will enjoy it as much as I do.

Current objects:

  • 93x Sphere
  • 39x Box
  • 9x Torus
  • 10x Triangle
  • 75x Cylinder
  • 9x Texture (9x Uploaded)
  • 6x Scripts (7x Props, 1x Door, 2x Smoke, 1x Bomb drop, 2x Display panel{various scripts}, 1x Steering wheel)
  • 6x Sound

227 prims total

Assignment 3: The final post

Its been an interesting few weeks for this project and I have enjoyed almost all of it.

Making my Kirov has been a rewarding experience for me, seeing, what started as a simple few prims out of curiosity become the impressive (at least in my opinion) build bellow has brought me much enjoyment and pride at my own ability’s.

Pic 21

Finished Kirov

As you can probably tell from the previous posts my least favorite part has been the texturing and my favorite the base build. However regardless of how much I liked each section I learnt heaps about not just Second Life’s process, but the way construction and texturing work in general.

My use of photoshop to build the scripts allowed me the increase my skills in this program and while scripting is not new to me, it was interesting to learn a bit about a different language.

Overall I feel like this assignment was time well spent, not just for marks, but also for increasing my skill set and personal enjoyment.

As this will likely be my last post on this blog I would like the thank my tutors for this course, Clare and Isa. Thank you for you time and help through out this course, it has been a awesome course for me and shall defiantly be recommending it to others.

Assignment 3: p9 Scanner and sounds

During this weeks in class session I requested some more Linden dollars from Claire. With the additional $50 I was given I was able to add several more sounds to my build.

Now all of the options in the ‘computers’ menu (bar web link) play a sound when click and so does the bomb drop button. I also added a sound to each of the four main engines to provide a more atmospheric environment when around and aboard the airship.

I also added a scanner option to the ‘computers’ menu (which also plays its own sound). This scanner will pick up any avatar in the area and list them in the chat box for the clicker to view.

I have also found an issue with my forward/stop script. While it seems to work most of the time, on random occasions the forward button will fail to start the props. I am unsure of how to fix the issue as it seems almost completely random.

Current objects:

  • 93x Sphere
  • 39x Box
  • 9x Torus
  • 10x Triangle
  • 75x Cylinder
  • 6x Texture (9x Uploaded)
  • 6x Scripts (7x Props, 1x Door, 2x Smoke, 1x Bomb drop, 2x Display panel{various scripts}, 1x Steering wheel)
  • 6x Sound

227 prims total

Assignment 3: p8 Under carriage and scripting

Over the past few days a huge amount of progress has been made into my build.

The first of this progress surrounds the aesthetics of the under carriage. I was previously unhappy with the look of this section of the build due to previously mentioned scaling issues. Looking over many airship pictures and designs from Google presented me with the solution.

Pic 20.JPG

New look under carriage

Keeping the structure the same width, I squashed it slightly, not enough to prevent movement, but defiantly enough to be noticeable. This gives the space a much bigger feel, despite no change in size. Texturing to object was easy, with a small modification to remove the bars from the texture I used the select face tool to line up the window on each panel and face. To replace the now missing bars I used the same trick from the main hull casing. This gave me the same effect as the texture version just without the downsides.

While minor, I also added a small handle to the door.

The second thing I have done is build up the inside of the under carriage. This includes adding two computer monitors, a steering wheel, four seats and a bomb drop button.

The steering wheel has a script attached to it which will say “Welcome aboard Kirov two hundred and seven of the Second Life Air force Commander (AVATAR NAME HERE)” and play a sound from the Red Alert 2 Kirov sound track.

The computer on the left will give the avatar a notecard with the following on it “Hello and welcome the my Kirov.
The Kirov is a large war blimp used in the Command and Conquer Red Alert 2 and 3 video games. This was made as part of my 3rd assignment for MUV601
Thank you for visiting GreyscaleApocalypse”


Pic 18.JPG

Bridge of my Kirov

The computer on the right will present the user with a menu, on which are three options. The first two of these are Forward! and Stop. Which will disable and re-enable the forward engines respectively. This system uses a script I found on the internet to shout on a negative dialog channel a 1 or 0. This is then detected by a script in the prop’s which is constantly listening on the same channel. When it “hears” the messaged number the script to turn the props will enable or disable as requested.

The final option on the computers menu will take the user to a link where the reference picture I used is kept.

Using a free tool called “Market Map Easy SitTarget Toll v2.10” I was able to create my first seat along the edge of the airship. I was then able to copy this seat to provide four seats for Avatars to sit on.

Finally we have the drop bomb button. This is located at the rear of the cabin and when pressed will spawn one of the bombs I made in the previous post just under the bombs already in the holder. The bomb will then drop to the ground and activate its particle effect. Currently I have not implemented a time to kill on the bombs so they can be inspected by Isa during the marking. However if I to use it in any other setting this would have to be implemented to prevent the random spamming of bombs.


Current objects:

  • 93x Sphere
  • 39x Box
  • 9x Torus
  • 10x Triangle
  • 75x Cylinder
  • 6x Texture (9x Uploaded)
  • 6x Scripts (7x Props, 1x Door, 2x Smoke, 1x Bomb drop, 2x Display panel{various scripts}, 1x Steering wheel)
  • 1x Sound

227 prims total

Assignment 3: p7 Scripts and particles

Over the past few days I made tones of progress into my scripting and even added a particle system.

With the visit to the particle lab a few weeks back I was determined to give my build a good one. After a bit of consideration I decided to add two exhaust pipes to the top of the outer shell as seen bellow, vising the particle lab again, I found a smoke script and with a little modification managed to create the effect I was looking for.

Pic 16.JPG

Exhaust pipes with particle system

While I was at the particle lab I also found a particle system for and explosion. This gave me an idea, while I had already wanted to make the bombs drop-able, the added explosion effect would add that final touch in my opinion.

Copying one of the bombs over to a free area I started to play with the script. While the effect looked good (If a little underwhelming due to particle limits) I didn’t want it to work all the time like the smoke did. To avoid this I found some information about buoyancy and collision detection and mashing it all together gave me the result I desired.

Pic 19

Bomb exploding

When the bomb is spawned it gains a buoyancy of 0.9 which causes it to start dropping slowly (while gaining momentum). When the bomb hits something the particle effect will start giving the explosion effect for ten seconds.

Current objects:

  • 93x Sphere
  • 35x Box
  • 8x Torus
  • 8x Triangle
  • 48x Cylinder
  • 6x Texture (5x Uploaded, 1x Local)
  • 3x Scripts (7x Props, 1x Door, 2x Smoke)

193 prims total

Assignment 3: p6 First scripts and carriage textures

Once again texturing is not my friend, this week I worked on the carriage textures which were a right nightmare to get looking good. Given that this will be the area under most scrutiny at close range I wanted to get this area looking really nice.

Unfortunately I had some serious issues with texture alignment between different sections of the carriage and the transparency in the windows left visible gaps which I could not find a way to fix.

Pic 14

Issues with first round of carriage textures

This issue has been side lined for now while I do some additional research into fixes for them.

However this is not the only thing I have been working on recently. I decided that to match the new textures I would add a moving door to the mix. So after a bit of research I found out how to make a script which will allowed me to create a sliding door which will open and shut slowly (much like a real air lock door does) when clicked on.

This is not all ether, the props on the Kirov will now spin constantly through the use of another simple script. While I would ideally like to have these user controllable, so that the avatar can turn these on and off through a control panel, I am happy with this at the current stage.

Pic 15

Prop and door in motion (your just going to have to trust me on this one)

I also made a slight modification the engines. Previously they were just stretched half spheres which looked okay, but I felt was a bit weird-looking. Now I have put a small cylinder in between the half sphere and the prop and made the half sphere smaller. This gives it a more realistic look in my opinion.

Current objects:

  • 91x Sphere
  • 35x Box
  • 8x Torus
  • 8x Triangle
  • 42x Cylinder
  • 6x Texture (5x Uploaded, 1x Local)
  • 2x Scripts (7x Props, 1x door)

184 prims total

Assignment 3: p5 Texturing continued

Utilizing the texturing skills I learnt in the previous post and in class I made several textures for the tails, engines and bomb bay of my Kirov. While these textures are applied to very different objects, only four texture were used for these sections as seen bellow.

This slideshow requires JavaScript.

These textures applied in a much easier manor then the front one and the result was certainly what I was looking for. While the bomb bay had to be done individually, the tail and engines could have the texture information copied over once I worked out the first.

This slideshow requires JavaScript.

I also added a glowing identification number to the back of the airship on both sides to add a bit of information to the Kirov and also fulfill some of the assignments requirements.

Pic 12.JPG

Kirov identification number

When I started this project I really had no idea what the results would be, but at this stage I have to say I am really proud of myself for creating what I have so far.

Additionally I picked a nice sky setting in the environment editor to match my the feel I want for my Kirov, this is called “Rot”.

Pic 13

What the Kirov currently looks like

Current objects:

  • 91x Sphere
  • 34x Box
  • 8x Torus
  • 8x Triangle
  • 39x Cylinder
  • 5x Texture (Uploaded)

176 prims total

Assignment 3: p4 Texturing is torture

As I found out this week, texturing is hard. My original plan was to create a texture that would put the framing lines around the main body, however because of the weird way Second Life maps its textures I was unable to create the effect I desired, despite trying over 25 different texture styles as seen bellow.

This slideshow requires JavaScript.

The lines instead of following the main body’s along like they should, stretched and warped in weird ways that no amount of manipulating could solve. Eventually I removed the lines all together and settled for just the face.

Pic 7.JPG

Texture not working as it should


After deciding the face I found on google did not do my design justice I made my own one which can be seen here.

Kirov RA2 1.0.1.jpg

Texture for Kirov front

To replace the lost lines I used several skinny spheres which are just bigger then the hull. I actually prefer this to my original idea as it provides a better 3D effect when viewing the Kirov from close or medium range.

Pic 8.JPG

Final front texture and replacement lines

Much google searching was done during this stage of construction and many a form was read about how the texturing issues could be solved. However I am not sure if I was simply looking in the wrong place or searching the wrong thing, but nothing I found would solve the issue. However I am happy with the results and hopefully then next bits of texturing won’t be so hard.

Current objects:

  • 91x Sphere
  • 30x Box
  • 8x Torus
  • 8x Triangle
  • 28x Cylinder
  • 1x Texture (local)

165 prims total

Assignment 3: p3 Under work and sizing issues

The final step in the basic construction of my Kirov was the under section. This was by far the most difficult bit so far, simply due to my Kirov not being to scale. Unfortunately I am unable to do anything about this as Second Life restricts the size prims to 64m in any direction. The rear of my Kirov’s main body is already 64m long and therefore I am unable to make it the correct size.

This meant that the construction of the under carriage and bomb bay had to be taken into specific thought, to make sure it not only looks good but is functional as well.

I started construction of the bomb bay first. Creating two bomb holders out of boxes and cylinders with a cut and hollow applied gave me an excellent ground work to model the rest of the outside casing on.

Pic 5.JPG

Bomb holders

After looking at several reference pictures and considering the feasibility and scale I decided on a custom design for the outer casing. Using a mixture of cylinders and spheres I created an aesthetically pleasing design that not only matches the Kirov styling but also shows off the bombs being held.

Speaking of which, I then set about creating the first bomb for my Kirov. This was made based of the reference Kirov design and the traditional WW2 bomb styling. Using a mixture of spheres, cylinders and boxes. The finished product was given a dark grey colour to distinguish it from the bomb bay and duplicated to fill the holder.

Pic 6.JPG

Finished bomb

Finally I started work on the carriage. At this stage it consists of a few cylinders with hollows and spheres on the end. I am honestly not happy with it at this stage, however I am leaving work on it till later in the build when I have the textures I require for it.

Pic 4

Bomb bay and under carriage

Current objects:

  • 65x Sphere
  • 30x Box
  • 8x Torus
  • 8x Triangle
  • 28x Cylinder

139 prims total